Ledger Wallet Guide (Recommended Cold Storage)
Wallet Provider: Ledger Ltd
Official Website: Ledger.com
Description: Ledger devices are widely considered to be some of the safest Cold Storage wallets available for holding Crypto Assets. The company is well established and highly trusted, consistently producing secure and high-quality devices used by millions of users globally. Ledger devices are interacted with via the Ledger Live interface which is incredibly easy to use for new and existing users of cryptocurrency.
PLEASE ENSURE YOU ONLY PURCHASE LEDGER DEVICES FROM THE OFFICIAL WEBSITE.
Supported Crypto Assets: Bitcoin (BTC), Ethereum (ETH), Litecoin (LTC), Dash (DASH), Golem (GNT), Augur (REP), Decred (DCR), Aragon (ANT), Gnosis (GNO), OmiseGo (OMG), Basic Attention Token (BAT), Civic (CVC), SALT (SALT), Bitcoin Cash (BCH), Ethereum Classic (ETC).
View the official list of Ledgers supported crypto assets by clicking here.
View this Guide or Download in PDF Format.
Last Updated: 10/10/2020
Step 1: Download Ledger Live
Download Ledger Live from the official website. https://www.ledger.com/ledger-live/download
This program allows you to interact with and access any of the Ledger products, Ledger Nano S, Ledger Nano X, and Ledger Blue.
Once downloaded start Ledger Live, choose a theme, and click on Get Started.
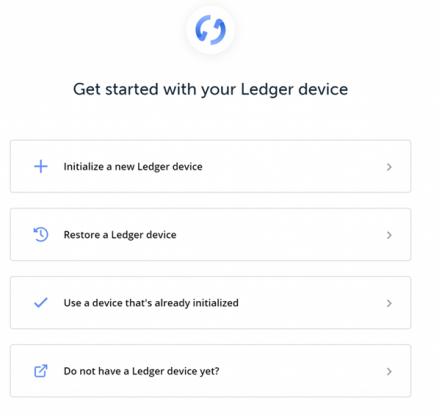
Click on Initialise a new Ledger device if your device is new. You can also Restore a Ledger device or Use a device that is already initialised if your device has already been set up.
Choose your device from the available options, Ledger Nano S, Ledger Nano X or Ledger Blue, and click continue.
Step 2: Set up Device
Connect the Ledger Nano S to your computer using the supplied USB cable.
Press the Left and Right buttons to navigate, press Both buttons to select.

Press Both buttons to Set up as New Device and Choose a Pin Code.
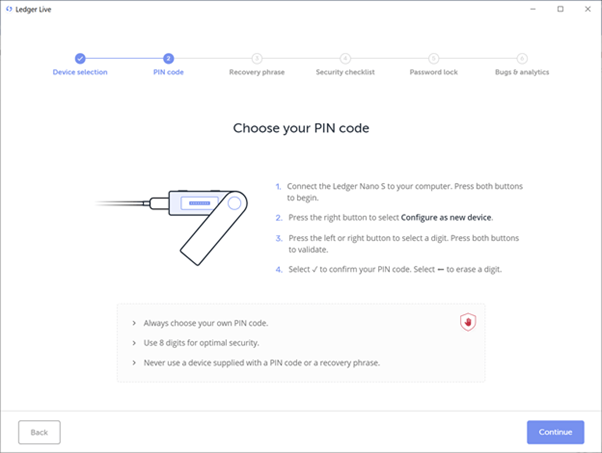
The Pin Code is required each time you access your device. Use the Left and Right buttons to select each number of your PIN Code. Press Both buttons to confirm it.
Select the X icon to erase a digit and the Tick icon to validate your Pin Code. Re-enter the Pin Code you just set to confirm it.
Make sure you have memorised or have a record of your PIN Code.
Click continue on Ledger Live to proceed to the Recovery Passphrase and next step.
Step 3: Write Down & Record Recovery Passphrase (Keep this safe)
Prepare to Write Down your Recover Passphrase on the Recovery Sheets supplied with the device.
The Recovery Passphrase is the only backup of your wallet's private keys providing access to your crypto assets. It is important you keep this information safe and never share it with anyone.
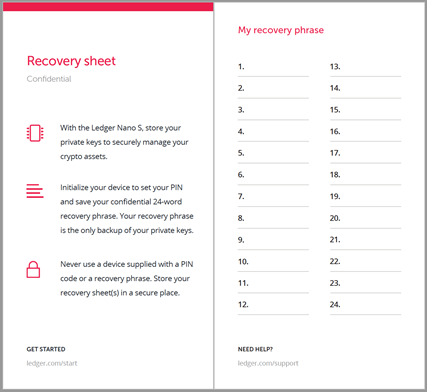
The Recovery Passphrase is displayed on the device screen, scroll through using the Left and Right buttons. Write down the words displayed on the Recovery Sheet, being careful not to make any mistakes. Repeat the process until all 24 words are written down.
It is strongly recommended to keep more than 1 backup of your Recovery Passphrase.
Confirm the Recovery Phrase by selecting the word that corresponds to numbers 1 through 24 on your device. The device will then say Processing and once complete your device is now ready.
- Complete the Security Checklist on Ledger Live and confirm your device.
- There is an optional Password Lock (Ledger Live Only) that can be set up.
- Select your Bugs and Analytics preferences.
The device is now set up and is ready to use.
Step 4: Access your wallets
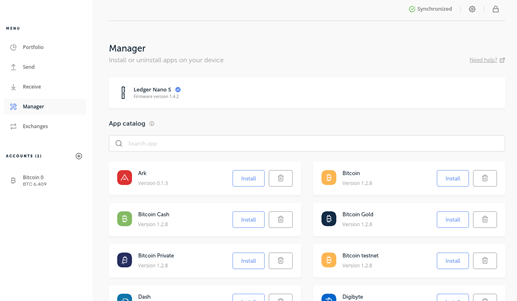
Within Ledger Live navigate to the Manager section, this is where you can install and uninstall wallet programs from your device. Proceed with installing the apps for the crypto assets you want to hold on your Ledger device.
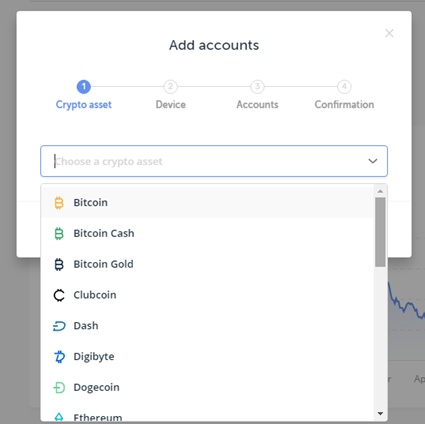
Once installed navigate to accounts and click Add Account.
Select the relevant Crypto Asset from the menu and open the same app on your Ledger device. When the device and Ledger Live has finished synchronising you can Add a New or Existing account.
Select an Account within Ledger Live and click Receive to locate your wallet address. Complete the steps to unlock and verify your device and wallet.
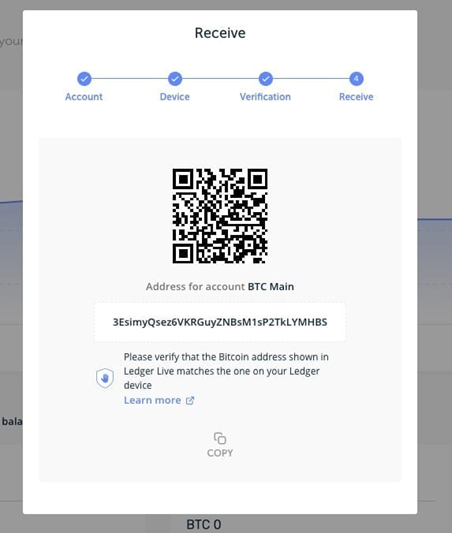
The wallet address will be displayed on screen and will appear on the Ledger device.
Example Bitcoin Wallet: 3EsimyQsez6VKRGuyZNBsM1sP2TkLYMHBS
Copy your Wallet Address by clicking the Copy feature. This is your Ledger devices Wallet Address used to receive Crypto Assets.
Make sure you only send compatible assets to the wallet. It is always best to double-check the Wallet Address before sending coins.
Step 5: Send Crypto Asset to Ledger Device
If you have not already got an account, you will need to Register or Login.
Navigate to the Buy Coins page to place an order via Bank Transfer or Debit/Credit Card.
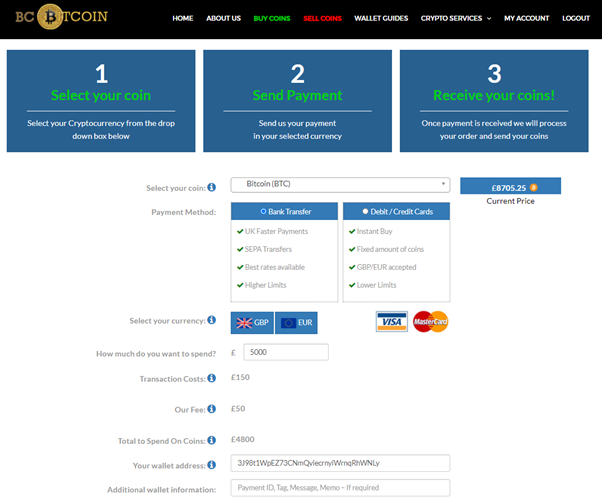
You can Buy and Sell all coins compatible with Ledger through BC Bitcoin.
- Select a Cryptocurrency to purchase and enter the amount to spend.
- Within the Your Wallet Address field, enter your wallet address (Any additional Info).
- Complete the order and payment, coins will be sent to your provided wallet.
Make sure you double-check your order and wallet information before submitting the order.
We check all wallet addresses are valid on the blockchain before sending coins. If you are still unsure, please contact us and we will assist you.
Ledger Wallets Overview
BC Bitcoin Rating: 5-Star
Advantages:
- Cold Storage wallet disconnected from the internet.
- High level of security for device and user.
- Well known and highly trusted company and brand.
- Affordable for all budgets and preferences.
Disadvantages:
- Recovery information is the only way to regain access.
- Not all Crypto Assets are supported by Ledger.
- Requires a computer and a small amount of technical knowledge.